This blog post is about multi-pitch climbing, particularly Royal Arches and Snake Dike in Yosemite and the East Face of Mt Emerson, Sierra Nevada, and lessons from preparation and consequences for enduring routes.
Over a one week period in late September/early October I was fortunate enough to get on three of the longest rock routes I’ve ever done, taking in two Yosemite moderate classics and one more alpine style California High Sierra peak. The combined length of the three routes is 4300 feet or over 1300 meters, making for over 40 pitches of average length which was a lot of pitches for me! As the three climbs led, one way or another, to a lot of climbing and rappelling in the dark, and in one case a cold night out on top of a mountain, I’ve distilled some lessons from these experiences that reflect different factors that cost time and, also the things that prevented these experiences from being more serious. Since multi-pitch climbing is a whole different game to single pitch climbing, I hope sharing these experiences might be of some interest for new outdoor climbers hoping to get on some of the many amazing longer routes on offer out there.
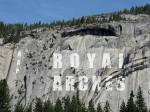
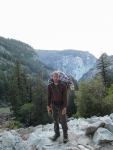
Route 1: The Royal Arches, Yosemite National Park, 16 pitches/1500 feet, 5.7
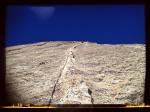
Ascending just right of the aptly titled Royal Arches which stand proudly above the regal Alwahnee Hotel, the Royal Arches route takes a line which runs a sweeping arc heading first from left to right for several pitches, then up, before swinging back to the left and topping out at the valley rim. The route has only a handful of 5.7 moves while most of the rest is easier, including sections of 4th class scramble and wide ledges to traverse. But it is long.
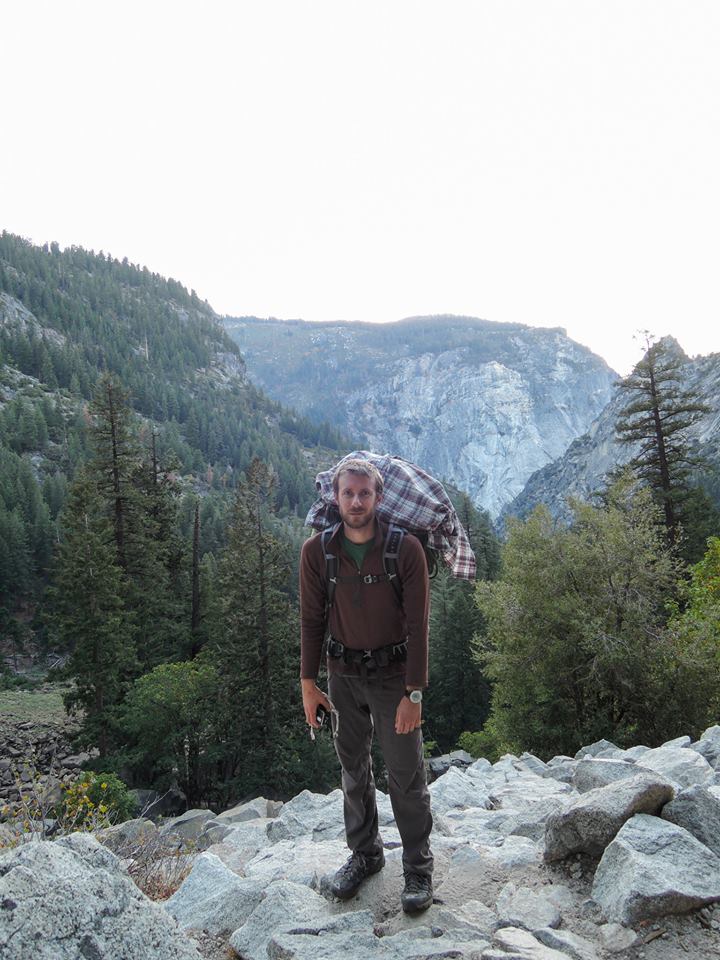
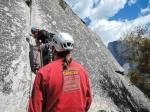
Given the location and grandeur of a wall that could be climbed relatively easy, this line received its first ascent way back in 1936. Almost 80 years later, our ascent in a party of three: Alexis, Matt and myself, got a late start after making the long drive from San Diego the night before. After a quick breakfast and gear sort saw us on the road for the hour long drive into the valley around 9am. The car park for this route happens to be adjacent to the five-star Alwahnee Hotel, so the approach (read: bathroom stop) also gets five stars! The first pitch – an awkward and polished chimney is just ten minutes walk from the hotel and we arrived here around 11am. With our party of three this pitch probably took us close to an hour to finish, but we warmed up our system of leading on double ropes and then belaying two seconds at once which is really the only option on long routes. Atop pitch one there is a huge ledge which we traversed across before meeting an easy fifth class section but, noting the massive exposure already, opted to rope up again for this and another fairly steep section. Almost completely across the bottom arc by now, the ledge narrowed and the more straight up pitches begin with the first crux moves of finger locks in pin scars and friction feet. With two leaders, we decided to lead in blocks of 2 or 3 pitches each which sped things up a little with fewer rack swaps, but it did require untying and retying for every pitch to keep the rope untangled and flowing smoothly. I took this and the next pitch and this is where the high quality granite and climbing really began. The next five or so pitches include shallow overlapping flakes/corners with multiple options for gear and direction, straight up cracks as fun variations, and some Manzanita greenery that both makes for fast and efficient belay stations when in the right place, but can also have a voracious appetite for sections of your rope when growing in the middle of a pitch.
At the point where the arc of this route swings back left, and tops out on a pillar right next to a really fun fixed rope pendulum. By now it was my lead block again and I was lucky to snag these awesome pitches, possibly the best of the whole route. First up was this traverse beginning with a little down climb then an A0 move to cross the blank slab and gain a ledge which runs near perfectly horizontal for the whole pitch. At this point storm clouds which had been building all day finally emptied but, to my amazement, it rained all around but not on us: Half Dome to our right was wet, and so was El Cap Meadow to our left, but we were dry. Nevertheless, all day I was regretting not packing my hardshell jacket in the small day pack. After the traverse the next pitch went straight up a few layback flakes before topping out after an awkward stemming corner with a large tree growing over it. Following this, undoubtedly the best pitch of the route, was a traverse around a corner followed by a beautiful hand crack and then shallow corners and cracks forever or until the rope runs out. I found a little ledge for a belay and brought up the seconds right as the sun set. Swinging lead again, the beautiful cracks continued but only a short way up to another tree belay. This and the following traverse pitch Matt led in the dark suffering some route finding difficulties as the tell-tale signs of worn rock and chalk are much less discernable in the dark. Finally, the fifteenth pitch was upon us and by now it was well and truly pitch dark. I took the final lead on this easy fifth class pitch and searched for the rappel bolts plugging in a few cams along the way. Fortunately I took another look at the topo before starting the pitch and was able to locate them next to a large block as indicated. Finally we finished the route sometime between 8 and 9pm, clocking 15 pitches of climbing in about 10 hours (the 16th pitch gains the rim, but the fastest descent is via the rappel route which begins at the 15th belay). But the relief of completion was short lived as the descent remained: 11 single rope rappels. In the dark. With two ropes we could link several of these, but finding the bolts on some proved tough. Parched, hungry, totally exhausted, and with patience wearing thin, we pulled the final ropes safely on the ground just a few minutes before midnight, 13 hours later, then made the hour long drive back to camp in Wawona for a late and well earned dinner.


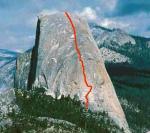
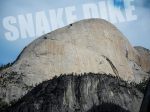
Route 2: Snake Dike Yosemite National Park, 8 pitches/800 feet, 5.7 R
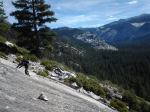
After the long day on the previous route day 1 of Snake Dike was spent recovering, arranging logistics such as back country camping permits and hiking up the exceedingly popular Half Dome Trail to make camp at the Little Yosemite Valley. The strategy of camping here or somewhere even closer to the base of the route is supposed to cut the approach time for Snake Dike in half or more…Unless you get lost for a couple of hours between camp and the route, that is. We knew something was up when hikers became visible on the horizon line, high up on a section the big rock we’d been sidling around. I had mistakenly assumed it was Liberty Cap, since we’d passed it in the dark the night before, however, the hikers confirmed it was in fact Half Dome meaning we were heading to the opposite side of the peak than the route was on. Going with someone who had done the route before can instill a false sense of confidence but after confirming the presence of the horizon hikers with the zoom functions on a digital camera we changed bearings and after some scrambling picked up the approach trail proper. En route Matt decided out since the approach mistake had taken valuable time. More problematic, however, was that our party realized that between the three of us we had only one headlamp, making the time issue all the more critical.
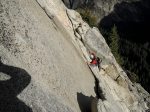
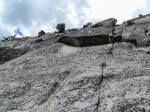
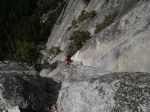
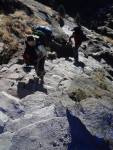
Properly back on route now we traversed the final and very exposed fourth class approach slabs to discover a little party happening at the base of this most popular route. Arriving at 11am there was a party on every belay station visible from the base plus five parties waiting to get on. Some parties opted to hike back down and get on something else but, optimistic that the groups would move quickly we stuck it out and eventually tied in sometime between 2 and 3pm. The 5.7 cruxes come in the first three pitches, with the first one probably presenting the greatest challenge to me. It involved an easy slab approach with some corner cracks on the right for protection before a headwall that requires a traverse back left under it across a slightly steeper and fairly featureless slab section. Having watched several parties tackle this right before us I took what seemed like the easiest option by placing some cams high up, down climbing, then tackling the friction traverse down lower where different crystal structure in the granite appeared to offer more friction. The moves were intimidating but, as on all slabs, once you trust your feet to the granite everything sticks and you’re back onto easier terrain. The next two pitches feature similar friction cruxes before the dike proper is gained and followed for the next few pitches. This was my first experience with the “R” grade (unprotected stretches of climbing) and it’s not to be taken lightly. Although the grade eases considerably in subsequent pitches, such as from 5.7 to 5.4, protection also decreases from nice gear on the first pitch, to some gear and a bolt on the second, to just two bolts on the third pitch which measures 160 feet (or 50m), to just one bolt on the 140 feet (~40m) fourth pitch! Far and away the greatest exposure I’ve experienced. As the climbing continues up the dome the angle eases and so too the grade, and after a more prominent angle change at the 8th pitch the remainder of the route is third class slabs to the summit.
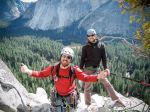
Given the crowds and late start we reached this section right on dark with some apprehension for route finding to the summit in the dark, but it proved pretty straight forward and we stood on the top of half dome about half an hour after the last twilight had passed. Surprisingly, the final unroped slab section is probably as long as the whole roped part of the route, which combined with the long approach and even longer descent makes for a very full day, particularly if you are doing this car to car. After quick snack, summit pic and splitting our remaining water it was time to make the long descent. Neither Alexis nor I had been there before so we weren’t quite sure where the descent cables lay. To make finding them more difficult the summit is dotted with hundreds of cairns marking nothing other than somebody’s earlier presence and some loose stones, but after sidling down and around for a bit we located the cables and descended, via ferrata-style with our harnesses and PASs.
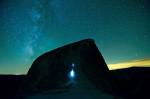
Halfway down the cables we noticed a party of hikers approaching on the otherwise deserted trail. Meeting them on the shoulder just below the cables it turned out one of them was a professional landscape photographer who had lugged his gear all the way there just in time to capture our descent, illuminated by head lamps and with the Milky Way stunningly silhouetted by Half Dome.

Fortunately we swapped emails and Peter Park (www.peterparkgallery.com) was happy to provide us with a copy of the picture. From here the trail back to little Yosemite Valley was obvious and we were back at the tents by 10:30 pm some 14 hours after leaving that morning.

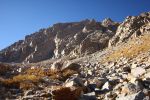
Route 3: East Face of Mt Emerson, Sierra Nevada, many pitches/2000 feet, 5.4
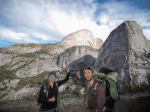
Mt Emerson is located in the section of the Sierras immediately adjacent to Bishop. My partner, Shannah, and I were first inspired to climb something up there after camping out near Bishop’s Happy Boulders the previous year and gazing up to peaks that didn’t seem either too far away or too high. The approach leaves Bishop, drives out past the Buttermilks and takes the steady incline of Highway 168 up to the very picturesque town of Aspendell. Arriving late one evening after the long drive from San Diego, it was the first or second day of October’s government shutdown and all the camping areas had already been closed. This was unfortunate since there is a beautiful campground right at the trailhead but we were forced to find something further down the hill. While scouting around for somewhere to pitch our tent we were also lucky enough to glimpse a mountain lion disappearing into the bushes near the trailhead.
The area around Aspendell was particularly beautiful. Bishop is surrounded with high desert scenery everywhere but with just a little elevation gain the desert yields to forests and lakes in alpine meadows. Already by early October the mornings were chilly and the forests had already started to turn putting on a spectacular show for fall. This would make for a nice scenic detour on a bouldering rest day and is also a popular area for fishing given the numerous lakes and connecting streams. Making our start around 7 am that morning we pulled down the tent and headed back up the hill to breakfast and rack up in some sunshine at the trailhead. The Paiute Pass trail which accesses Mt Emerson is mainly a hiker’s entry point to the John Muir Wilderness area beginning at an elevation of just over 9,000 feet.
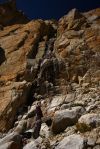
Finally packed, racked and caffeinated, we were on the trail at 11 am. The approach ended up taking close to two hours, gaining around 2,000 feet to the base of the route which begins in a darker patch of rock at the base of a chimney. As this feature is visible from the trail from quite a distance the route is straight forward to locate. At the base at 1 pm now we were already hesitant as to whether or not there was enough daylight left but decided to tie in for the first—and crux—pitch anyway. This 5.4 pitch went easily but, bypassing a good quick sling belay I stretched a full rope length then had trouble finding gear for a good anchor. The route follows a chimney looking system, much of which is 5th class, for close to 2000 feet of vertical climbing. It seems the chimney has been formed through rain erosion which while removing much of the loose outer rock has also made many of cracks too shallow and flaring to take gear. The lack of gear is no problem for most parties, who apparently solo the whole route. But not wanting to take that risk I was left scratching around for placements in these features.
At this point though we had been moving all day, it was already mid afternoon and we discussed whether we should continue or bail. The total absence of any fixed gear on this route—bolts, rap stations, etc.—would make retreating much higher difficult and possibly costly if we needed to leave gear behind. Accepting the high likelihood by now of getting benighted, we decided to continue anyway as we’d packed lightweight bivvy gear so we switched to simul-climbing. Simul (for simultaneous) climbing is a technique where the rope is shortened, usually via shoulder coils, and both climbers tie in to the shortened length. To begin the leader is belayed as usual and places gear while climbing but instead of building an anchor and belaying after a pitch or so they pause for the second to dismantle the bottom belay anchor and both then climb simultaneously. Attention must be paid to the amount of slack rope between both climbers and also the number of gear placements between them, and the second must not fall. But the advantage is that it is a much faster way to move over easy terrain. Under pressure of remaining daylight we hammered along as fast as we could for the next five hours or so, stopping only to belay when I’d placed almost every piece of the single rack of cams and wires. Once on the wall route finding was relatively straight forward but it was difficult to see how close we were to the summit. The rock in the chimney system was for the most part was pretty good but some patches with reddish tones tended to be more friable and the walls either side seemed really chossy.
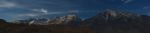
After a good effort and a couple of frustrating false summits, with daylight failing we finally reached what I thought was close to the top only to be greeted by a long, airy ridge traverse against a stunning orange sky. By this point we may have tended too far left on the upper wall but it was hard to tell. With the setting sun the temperature dropped so we took a short break to layer up, attach headlamps to helmets, and returned to normal pitch climbing. By now it was quite dark and the next section, which had prompted us to return to normal pitch climbing, seemed as difficult as the first but did put us on the summit ridge proper. After the sun sets the temperature differential between the mountains and the plains increases and it became quite windy. Basically, the hot air rises off the plains and with not much in between us and there we encountered a persistent wind, which along with wearing beanies under our climbing helmets, made communication difficult. Traversing this ridge was also quite zig-zaggy causing rope drag and slowing our progress. Finally, getting exhausted at around 11pm we found a small ledge protected from the wind and, sitting down to rest we both went straight into a nap. This was undoubtedly the effect of high altitude as now we were at about 13,000 feet, just shy of the summit. Given the difficulty of communication and effects of altitude we finally made the call to sit out the night on this ledge and descend in the morning with the safety of warmth and daylight.
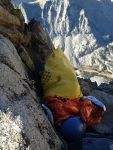
Though I consider getting benighted to be somewhat a disaster, our discomfort was lessened by some items I keep in my pack. One is a lightweight plastic bivvy bag which we could both climb into. I also always carry an emergency blanket and my Osprey Mutant climbing pack has a closed cell foam pad in the backrest. The rope we flaked out on the ledge to insulate from the ground and the pad and our packs insulated from the small rock walls. We both then put on all of our layers—I was thankful for my big down jacket—rearranged the anchor and tethers for safety while dozing, then climbed into the bivvy sack, wrapped ourselves the emergency blanket and huddled. On the approach I’d noticed patches of ice on the ground indicating the previous evening had been freezing. Likewise during the last pitches the water in the mouthpiece of my camelback had started to freeze so, concerned about our remaining drinking water freezing I was also careful to put this in the bivvy sack. To keep an eye on the temperature I attached my watch to the belay anchor and checked it frequently as the biggest fear now was how cold the night would get, but luckily the temperature didn’t drop much below freezing and with all of our gear we were able to keep the shivers away for the most part.
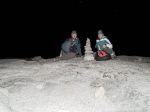
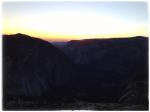
Although the altitude was not sufficient to cause any serious health issues, the other effects for me are loss of appetite which is really a problem for keeping up energy levels, and also difficulty sleeping. But this meant I could take in the spectacular night sky frequent falling stars and different hues of darkness and light changing all through the night, something I’d never noticed before. With first light our amazing position was revealed with views of multiple high Sierra peaks, glacial valleys and lakes and remnant glaciers on one side and the plains back to Bishop on the other. It was clear that we had traversed the ridge far enough to gain the descent, which is via a large scree slope taking up most of the south side of the peak. And so, with little enthusiasm for the summit, we made two rappels leaving some tat and a wire and we were finally on the descent slopes.
Once benighted our biggest mistake was not switching into our regular shoes. My own are pretty roomy and even with thick socks underneath my feet were fine. But Shannah’s Muiras are more aggressive and keeping them on all night reduced circulation in her feet enough that, combined with the cold temps, caused mild frostbite that made the descent, and indeed walking for the next month, painful. Although I suspected that we could have descended from the ledge we slept on, under the circumstances it was probably safer to sit out the darkness since we’d packed enough bivvy gear to keep warm enough.

Some lessons from three routes and a lot of darkness
*Note that this is not advice, but simply lessons I learned from my trips.
Lesson 1: embrace the “alpine start”.
An important lesson common to all three epics was simply to have started earlier. Never one for early mornings, this is something I’ll have to work on. One way to start earlier is to camp as close as is practical to the base of the route. Government shutdown notwithstanding, this might have been the difference between spending the night on top of Mt Emerson or not. But that said camping in Little Yosemite Valley and thus closer to the base of Snake Dike made little difference after the little geographical embarrassment, which brings me to lesson number 2.
Lesson 2: read the topo.
Sounds obvious, but by read I actually mean re-read before every pitch. Guidebooks can be bulky to carry on long climbs so an easier option is simply snap some pictures of the topos with a smart phone. However, with this option you run the risk of dropping something both expensive to replace and also a useful communication devise in case of emergency, or simply even of just wearing the battery down. A better option but one requiring a little more planning is to photocopy the relevant pages from the guide and even carry a copy on each climber.
Lesson 3: never defer responsibility.
One member in our party of three had been on both Yosemite routes before, however, his memory of the approach route to Snake Dike was patchy at best. After walking around lost for an hour or two he then decided to let the two of us who hadn’t been on it before continue since we’d be faster as two, considering the time by then we’d likely actually start the route. This left me in charge with only a foggy recollection of the approach notes and no approach topo. Fortunately I did have pictures of the pitch topos on my phone as well as a few trail maps I could photograph along the way.
Lesson 4: gear check.
By gear check I mean check each other’s gear before leaving camp, or the car, or wherever. This is sort of like applying the buddy check system commonly used in climbing well ahead of actually putting on harnesses and tying in. Asking whether everyone has their head lamp, lunch, water, climbing shoes etc. can even be the difference between getting on the climb or not.
Lesson 5: prepare for the worst.
I’ve been carrying emergency blankets around for years but Mt Emerson was the first occasion to have ever actually needed one. The following items made the night out considerably more comfortable and the added weight was little additional encumbrance while actually climbing: safety blanket, thermals, beanie, downie with a hood, bivvy bag, foam bivvy mat from inside my pack. I would have added to this list: downie with a hood for each climber, safety bags rather than blankets as these turned out to be a bit useless in the wind, and one of these for each person. Looking back it was interesting to note the range of different factors which resulted in getting benighted. An earlier start certainly would have helped, but we still started reasonably early. The government shutdown, in its own way, also affected the situation by changing our plans (we were originally headed to Toulumne) and then causing some headaches with camping which cost at least an hour that morning.
Lesson 6: anchor and gear efficiency
On Snake Dike the party immediately behind us were stalled at each belay station. It didn’t appear that they were climbing that much faster than us so the time differences were all in the style of anchoring systems used at each belay. My practice has usually been to bring a few different bits and pieces which are adaptable to multiple scenarios that can be encountered at belay stations. But the belays on this route are all bolted so the faster option here was simply to have two pre-made and equalized anchors that could be clipped and belayed on in under a minute or so.
Lesson 7: invest in some sort of emergency communication device.
On Mt Emerson although we could clearly see Bishop neither of us, with different carriers, had any cell reception. Luckily in backcountry areas where conventional telecommunications technologies have limited coverage there are a few other options. The DeLorme inReach series are two-way satellite communication device which can send and receive text messages and emergency SOS signals from basically anywhere on earth. Models include an adapter which enables satellite communications from an ordinary smart phone and standalone units. Spot also make units which adapt smartphones in the same way. While these units require subscription plans much the same as cell phones they seem to me preferable to personal locator beacons since they can communicate a range of different disaster scenarios and also let you receive updates as to any evacuation plans while they are happening. Some of the more advanced models which integrate regular GPS units with two-way radio or satellite emergency communication are really cool, though the smart phone integrations have considerably more functionality than standalone units. A key part of all of this—regardless of gadgetry—is of course telling someone your trip intentions before you go. But after watching 127 Hours we all do this routinely now anyway, right?
– Rene Provis